Backup of Unix servers
Backup of WinXP


| Managing Amanda backup |
|
Amanda backup system Backup of Unix servers Backup of WinXP | | |
 Amanda backup system
Amanda is an automated system for backing up and recovering disk and file systems, that have been developed by the Univerity of Maryland.
Amanda can be installed on multiple platforms, it runs over a network, so a single amanda server can backup multiple workstations, and taking advantage of Samba, it can be used to backup disks over a Microsoft network.
Amanda runs along a cycle, after which the backup tapes are reused. It can perform two types of backup:
Backup policy, as implemented at CSIM is as follow:
Note: limitation on the backup for Microsoft stations makes it necessary that an agreement is obtained among the many users of a shared machine. Back up will never work properly if one user decide to bak up one directory one day and another user change it to another directory another day. A good way to proceed would be to define a common directory called C:\users\ and to put individual files in sub-directories. C:\users\ should them become the share to backup.
Note: backup will only be performed if the computers are running at the time of the backing up.
Backup of Unix server Backup of Windows XPBefore Amanda can backup any Microsoft Windows file, the files or directories must be made accessible to Amanda. This is called sharing a directory. This directory become a share.
|
Before any sharing can be done, the network must be configured to allow such operation. Open Start/Settings/Network Connections/Local Area Connection and click on Properties. Make sure that the needed services are present: Client for Microsoft Networks, File and Printer Sharing for Microsoft Network and Internet Protocol (TCP/IP). |
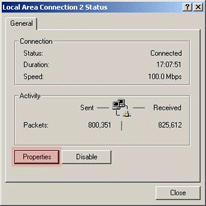 Local Area Connection |
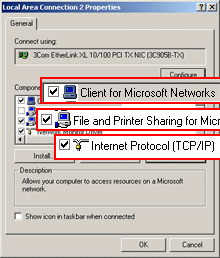 Local Area Connection Properties |
Windows XP can have multiple users, each with some restriction on the access to the computer.
To backup Windows XP files, you must first create a user that will have backup access to the computer. Do not use the administrator account or password for backup purposses.
|
|
The program to add new users is accessible through Start/Programs/Administrative Tools/Computer Management. Select System Tools/Local Users and Groups/Users and click on Action/New User... You can then provide the information for the new user, including user name and password. You will give these name and password to Amanda later, so make sure you remember them. Note: user name and password must contain only letters and numbers. Spaces are not allowed. Select the box so the password will never expire. From the list of users, double click on the new user you have just created so you can edit the properties. Under the tab Member Of, make sure that the backup user belongs to the Backup Operators group. To add the Backup Operators group, you must make sure that the Object Types is Group and the Location is the name of your computer. If you click on Advanced and Find Now, you will be able to select from a list of groups. Note: the name of the group is in the form MACHINE\Backup Operators. |
|
Shares can now be created. Open a Window explorer select the directory you want to share and open the properties dialog box. This is done with the right button of the mouse.
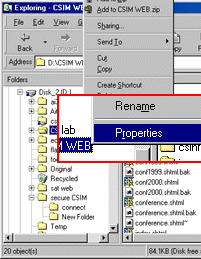 Select properties of a directory |
In the properties dialog box, on the Sharing tab, you must first select the button that allows to share that directory. Then you must select a name for that share. In selecting the name, you must make sure that only letters and numbers are used. Upper case and lower case letters are equivalent. Do not use space in the share name. Click on the Permissions button for the next step. |
 Sharing property |
 Give permission to the share |
Permission can be given by group or by user. Make sure the backup user exists with Full Control access, else click on Add button to add it to the list of permitted users. You can choose to add only the user that you had created above, or to add all the backup group. Double click on a user name to check his permission access. |
 Security property |
Select the Security tab from the Properties dialog box. Make sure the user you created for backup purposes, or the Backup Operators group is present in the list and have Full Control access. If not, you can add them like above. Once it is shared, a directory will appear with a hand holding the folder icon, to remember that this directory is shared. |
|
 Windows Firewall |
Click on Start/Settings/Control Pannel/Windows Firewall. Click on Off.
Very Important |
Backup Share name None Full Incr cygwin drivec mule temp
Click on to register your changes.
| Powered by: |
      |
| Contact us: Olivier Nicole |   
| Page generated automatically |


